Hello, tech enthusiasts! 🚀 Whether you’re a seasoned DevOps guru or just dipping your toes into the world of continuous integration and deployment, this guide is tailored just for you. Today, we’ll embark on a journey to set up a Jenkins server on an Ubuntu 24.04 system using the latest OpenJDK 21 and secure it with Nginx and Let’s Encrypt SSL certificates. Ready? Let’s dive in! 🌊
🔧 Prerequisites
Before we get our hands dirty, let’s ensure we have everything in place:
- Ubuntu 24.04 Server: A fresh installation is ideal.
- Sudo Privileges: You’ll need administrative rights to install and configure software.
- Domain Name: A fully qualified domain name (FQDN) like
jenkins.yourdomain.compointing to your server’s IP (required for SSL). - Internet Connection: To download packages and dependencies.
🚀 Step 1: Update Your System
Keeping your system updated is the first step to a smooth installation process. Let’s start by updating and upgrading your existing packages.
sudo apt update && sudo apt upgrade -y
📝 What this does:
sudo apt update: Refreshes the package lists.sudo apt upgrade -y: Upgrades all installed packages to their latest versions without prompting.
🛠️ Step 2: Install OpenJDK 21
Jenkins runs on Java, so installing the latest version is crucial for performance and security.
a. Add the OpenJDK PPA
Ubuntu’s default repositories might not have OpenJDK 21 yet. We’ll add a Personal Package Archive (PPA) to get the latest version.
sudo apt install -y software-properties-common
sudo add-apt-repository ppa:openjdk-r/test -y
sudo apt update
🔍 Why a PPA?
PPAs allow you to install newer versions of software that aren’t yet available in the official repositories.
b. Install OpenJDK 21
sudo apt install -y openjdk-21-jdk
c. Verify the Installation
java -version
💡 Expected Output:
openjdk version "21.0.x" 202X-XX-XX
OpenJDK Runtime Environment (build 21.0.x+XX-Ubuntu-XXXX)
OpenJDK 64-Bit Server VM (build 21.0.x+XX-Ubuntu-XXXX, mixed mode, sharing)
d. Set Java 21 as the Default (If Multiple Versions are Installed)
If you have multiple Java versions, ensure OpenJDK 21 is set as the default.
sudo update-alternatives --config java
Select the option corresponding to OpenJDK 21.
🗄️ Step 3: Add Jenkins Repository and GPG Key
To install Jenkins, we’ll add its official repository and ensure our system trusts its packages.
a. Install Necessary Packages
sudo apt install -y wget gnupg2 software-properties-common
b. Add the Jenkins Repository GPG Key
This step ensures that the packages downloaded from the Jenkins repository are authentic.
wget -q -O - https://pkg.jenkins.io/debian-stable/jenkins.io.key | sudo gpg --dearmor -o /usr/share/keyrings/jenkins.gpg
💡 Explanation:
wget -q -O -: Downloads the Jenkins GPG key silently and outputs it.sudo gpg --dearmor -o /usr/share/keyrings/jenkins.gpg: Converts the key to GPG format and stores it securely.
c. Add the Jenkins Repository to Sources List
echo "deb [arch=amd64 signed-by=/usr/share/keyrings/jenkins.gpg] https://pkg.jenkins.io/debian-stable binary/" | sudo tee /etc/apt/sources.list.d/jenkins.list
📝 Breakdown:
deb [arch=amd64 signed-by=/usr/share/keyrings/jenkins.gpg]: Specifies the architecture and associates the repository with the GPG key.https://pkg.jenkins.io/debian-stable binary/: The Jenkins repository URL.sudo tee /etc/apt/sources.list.d/jenkins.list: Adds the repository to your system.
📦 Step 4: Install Jenkins
Now that the repository is set up, installing Jenkins is straightforward.
sudo apt update
sudo apt install -y jenkins
🎉 Congrats! You’ve just installed Jenkins on your system.
⏯️ Step 5: Start and Enable Jenkins Service
Ensure Jenkins starts automatically on boot and is currently running.
sudo systemctl start jenkins
sudo systemctl enable jenkins
🔍 Check Jenkins Status:
sudo systemctl status jenkins
💬 Expected Output:
jenkins.service - Jenkins Continuous Integration Server
   Loaded: loaded (/lib/systemd/system/jenkins.service; enabled; vendor preset: enabled)
   Active: active (running) since ...
🔐 Step 6: Adjust Firewall Settings
To allow traffic to Jenkins, we’ll adjust the firewall to permit connections on port 8080.
a. Allow Jenkins Port
sudo ufw allow 8080
sudo ufw status
b. Enable UFW (If Not Already Enabled)
sudo ufw enable
🛡️ Security Tip:
Only open necessary ports to minimize potential attack vectors.
🌐 Step 7: Access Jenkins Web Interface
Now, let’s see Jenkins in action!
a. Retrieve the Initial Admin Password
Jenkins requires an initial password to unlock the setup wizard.
sudo cat /var/lib/jenkins/secrets/initialAdminPassword
🔑 Copy the Password:
You’ll see a long string of characters. Copy it to your clipboard.
b. Open Jenkins in Your Browser
Navigate to http://your_domain_or_IP:8080
Example: http://192.168.1.100:8080
c. Unlock Jenkins
- Paste the Password:
Enter the copied password into the “Administrator password” field.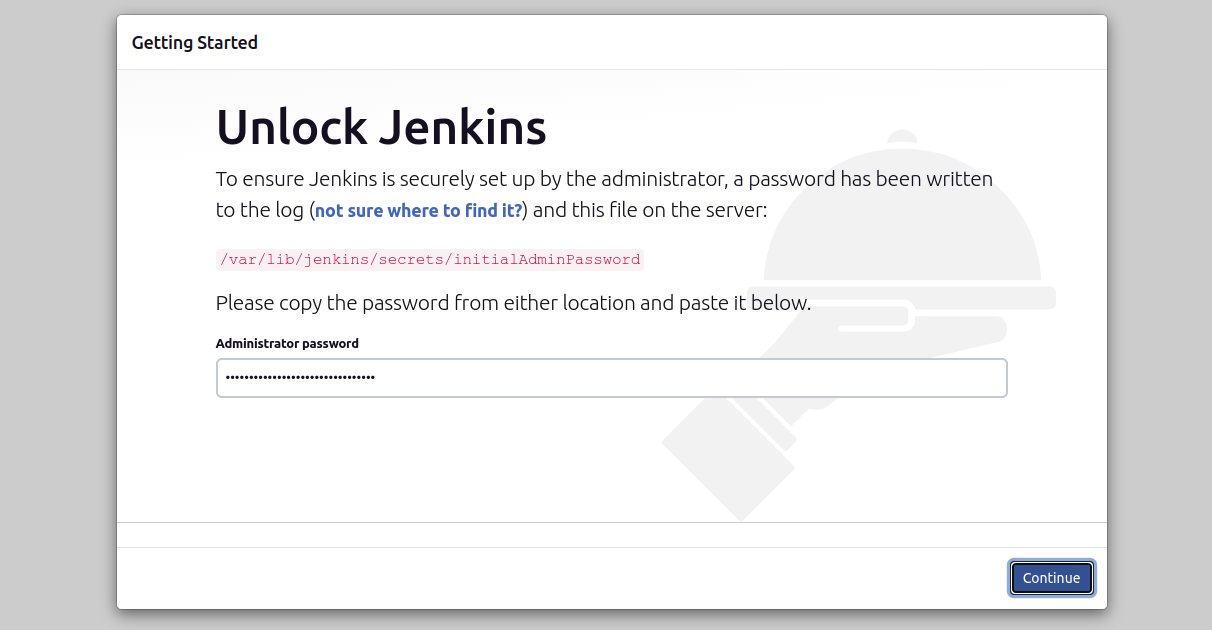
- Click “Continue”
d. Customize Jenkins
- Install Suggested Plugins:
Recommended for beginners to get started quickly.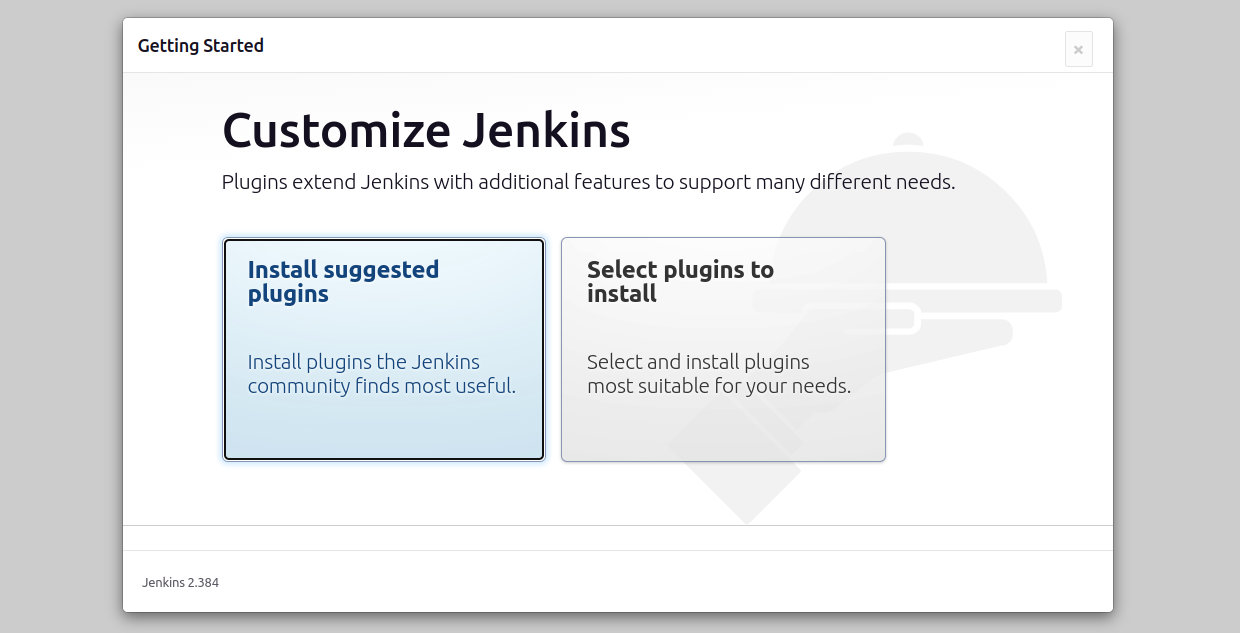
e. Create the First Admin User
- Fill in User Details:
Provide a username, password, and other required information.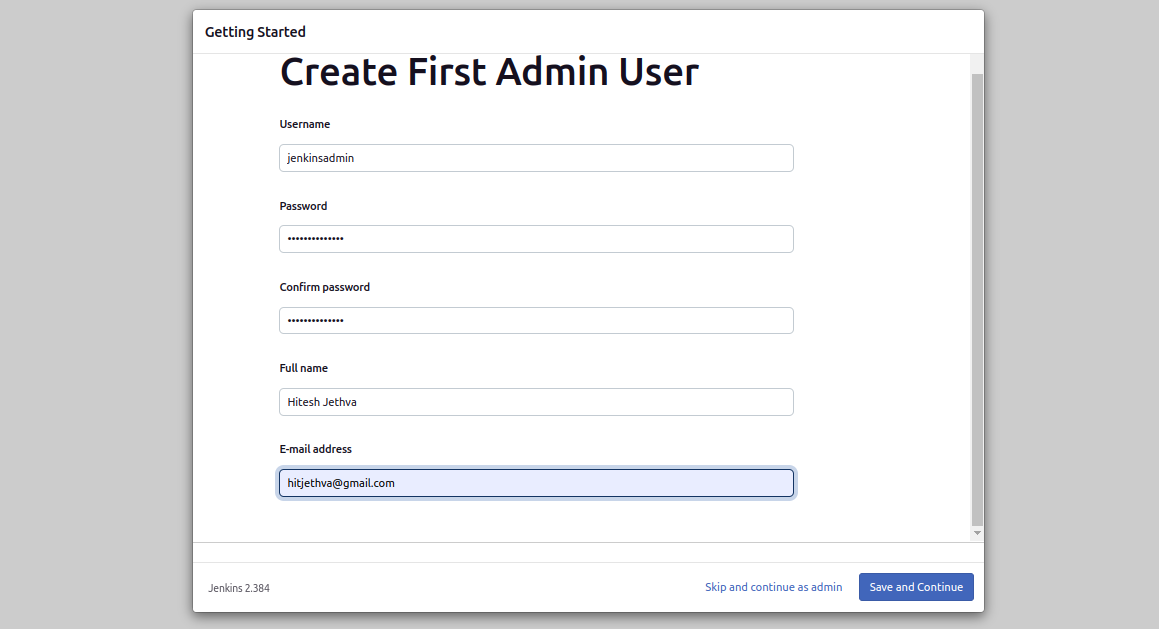
f. Instance Configuration
- Set Jenkins URL:
Ensure it’s set tohttp://your_domain_or_IP/or laterhttps://your_domain/if your going to use SSL.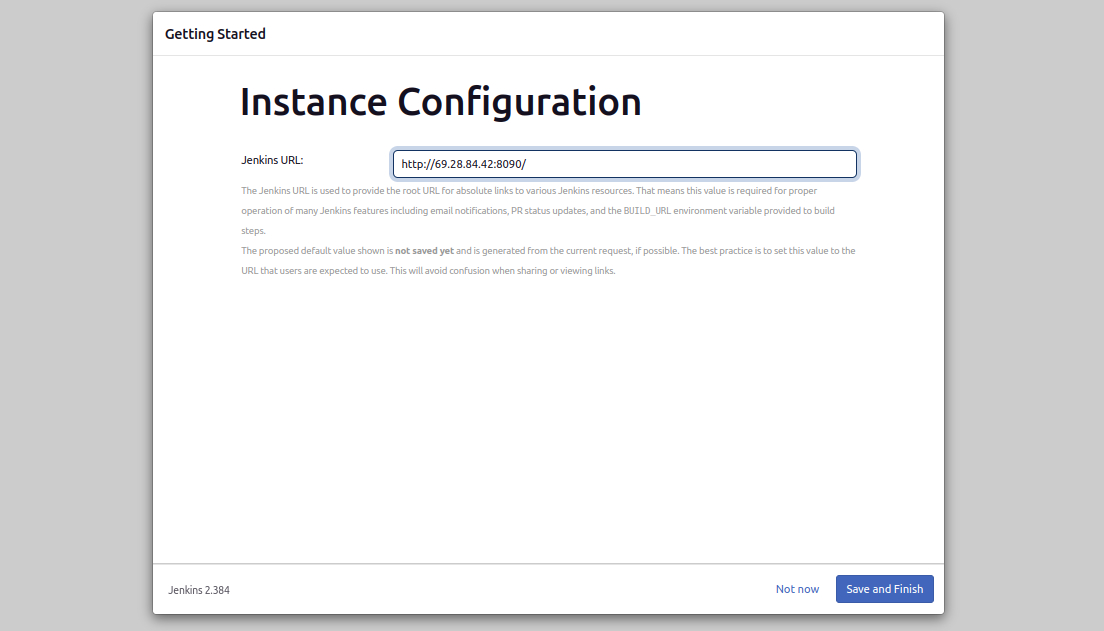
g. Start Using Jenkins
- Click “Start using Jenkins”
You’re now ready to explore Jenkins! 🎈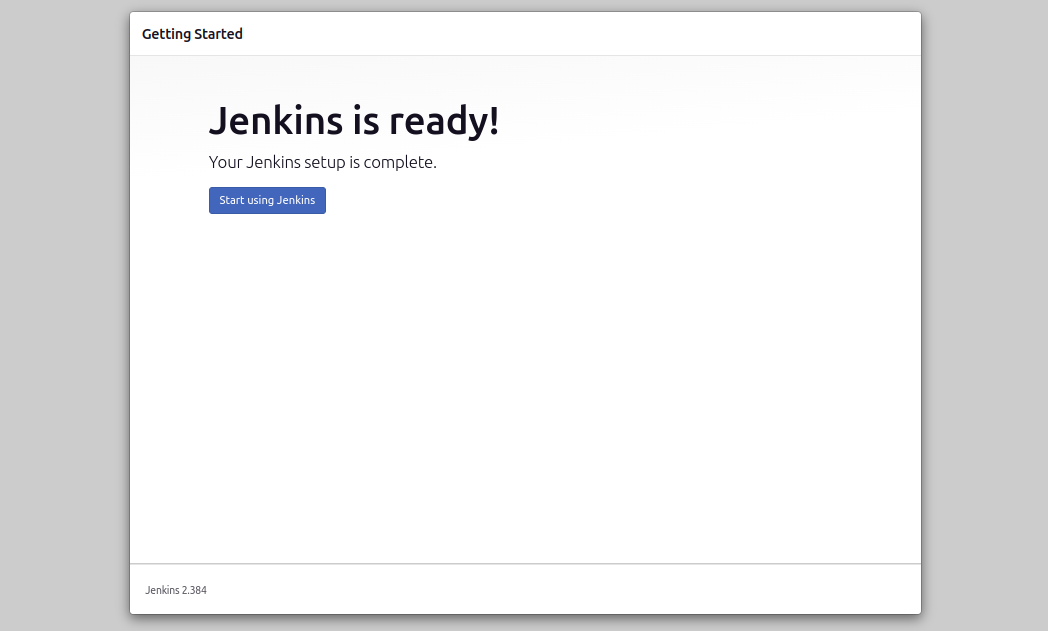
🛡️ Step 8: Configure Nginx for Secure (HTTPS) Connections
Now, let’s secure your Jenkins server by configuring Nginx as a reverse proxy with HTTPS. We’ll use your customized nginx.conf and Jenkins site configuration, replacing placeholders appropriately. 🛠️🔒
🔍 Understanding the Configuration Files
/etc/nginx/nginx.conf: The main Nginx configuration file that defines global settings./etc/nginx/sites-available/jenkins: The site-specific configuration for Jenkins./etc/nginx/sites-enabled/jenkins: A symbolic link to the site configuration, enabling it.
📄 Your Customized Nginx Configuration
You’ve provided your own nginx.conf and Jenkins site configuration. Let’s integrate them into our setup with placeholders for easy customization.
📝 a. Update the Main Nginx Configuration (nginx.conf)
Here’s your current nginx.conf. We’ll keep it mostly unchanged but ensure it includes our custom settings for Jenkins.
user www-data;
worker_processes auto;
pid /run/nginx.pid;
error_log /var/log/nginx/error.log;
include /etc/nginx/modules-enabled/*.conf;

events {
    worker_connections 768;
    # multi_accept on;
}

http {
    ##
    # Basic Settings
    ##

     # Define Rate Limit Zone for Jenkins
    limit_req_zone $binary_remote_addr zone=jenkins_limit:10m rate=10r/s;

    sendfile on;
    tcp_nopush on;
    types_hash_max_size 2048;
    server_tokens off;

    # server_names_hash_bucket_size 64;
    # server_name_in_redirect off;

    include /etc/nginx/mime.types;
    default_type application/octet-stream;

    ##
    # SSL Settings
    ##

    ssl_protocols TLSv1 TLSv1.1 TLSv1.2 TLSv1.3; # Dropping SSLv3, ref: POODLE
    ssl_prefer_server_ciphers on;

    ##
    # Logging Settings
    ##

    access_log /var/log/nginx/access.log;

    ##
    # Gzip Settings
    ##

    gzip on;
    gzip_types text/plain text/css application/json application/javascript text/xml application/xml application/xml+rss text/javascript;
    gzip_min_length 256;
    gzip_vary on;
    gzip_proxied any;
    gzip_comp_level 5;
    # gzip_vary on;
    # gzip_proxied any;
    # gzip_comp_level 6;
    # gzip_buffers 16 8k;
    # gzip_http_version 1.1;

    ##
    # Virtual Host Configs
    ##

    include /etc/nginx/conf.d/*.conf;
    include /etc/nginx/sites-enabled/*;
}

#mail {
#    # See sample authentication script at:
#    # http://wiki.nginx.org/ImapAuthenticateWithApachePhpScript
#
#    # auth_http localhost/auth.php;
#    # pop3_capabilities "TOP" "USER";
#    # imap_capabilities "IMAP4rev1" "UIDPLUS";
#
#    server {
#        listen     localhost:110;
#        protocol   pop3;
#        proxy      on;
#    }
#
#    server {
#        listen     localhost:143;
#        protocol   imap;
#        proxy      on;
#    }
#}
🔑 Key Points:
- Rate Limiting (
limit_req_zone): Protects Jenkins from excessive requests by limiting the rate to 10 requests per second per IP address.- Gzip Compression: Optimizes data transfer by compressing responses, improving load times.
- Turn Off Server Tokens: This will hide your nginx version which make security vunerablities more ambiguous.
📌 Note: Ensure that your
jenkins_limitzone parameters align with your expected traffic.
📝 b. Configure the Jenkins Site
Now, let’s set up the Nginx server block for Jenkins. This configuration ensures that all traffic to jenkins.your_domain.com is securely proxied to your Jenkins server running on localhost:8080. Remember to update jenkins.your_domain.com with your actual domain address.
i. Create the Jenkins Server Block
sudo nano /etc/nginx/sites-available/jenkins
ii. Add the Following Configuration:
server {
    if ($host = jenkins.your_domain.com) {
        return 301 https://$host$request_uri;
    } # managed by Certbot

    listen 80;
    server_name jenkins.your_domain.com;
    return 404; # managed by Certbot
}

server {
    server_name jenkins.your_domain.com;

    # Enable HTTP/2
    listen 443 ssl http2; # managed by Certbot

    # SSL Certificates
    ssl_certificate /etc/letsencrypt/live/jenkins.your_domain.com/fullchain.pem; # managed by Certbot
    ssl_certificate_key /etc/letsencrypt/live/jenkins.your_domain.com/privkey.pem; # managed by Certbot
    include /etc/letsencrypt/options-ssl-nginx.conf; # managed by Certbot
    ssl_dhparam /etc/letsencrypt/ssl-dhparams.pem; # managed by Certbot

    ## Security Headers
    add_header X-Frame-Options "DENY" always;
    add_header X-Content-Type-Options "nosniff" always;
    add_header X-XSS-Protection "1; mode=block" always;
    add_header Strict-Transport-Security "max-age=31536000; includeSubDomains" always;
    add_header Referrer-Policy "no-referrer" always;
    add_header Content-Security-Policy "default-src 'self';" always;

    ## Access and Error Logs
    access_log /var/log/nginx/jenkins_access.log;
    error_log /var/log/nginx/jenkins_error.log warn;

    ## Rate Limiting
    limit_req zone=jenkins_limit burst=20 nodelay;

    ## Client Body Size Limit
    client_max_body_size 100M;

    location / {
        # (Optional) Basic Authentication
        # auth_basic "Restricted Access";
        # auth_basic_user_file /etc/nginx/.htpasswd;

        proxy_pass http://localhost:8080;

        ## Preserve Host and Client Information
        proxy_set_header Host $host;
        proxy_set_header X-Real-IP $remote_addr;
        proxy_set_header X-Forwarded-For $proxy_add_x_forwarded_for;
        proxy_set_header X-Forwarded-Proto $scheme;

        ## WebSocket Support
        proxy_http_version 1.1;
        proxy_set_header Upgrade $http_upgrade;
        proxy_set_header Connection "upgrade";

        ## Proxy Buffering
        proxy_buffering off;

        ## Timeouts
        proxy_connect_timeout 60s;
        proxy_send_timeout 60s;
        proxy_read_timeout 60s;
        send_timeout 60s;

        ## Caching Controls
        proxy_cache_bypass $http_upgrade;
        proxy_no_cache $http_upgrade;

        ## Limit Request Methods (Moved Inside Location)
        limit_except GET POST HEAD {
            deny all;
        }
    }
}
🔄 What Changed?
- Domain Replacement:
Changed all instances ofjenkins.amelioratesdev.comtojenkins.your_domain.com.Remember: Replacejenkins.your_domain.comwith your actual domain name throughout the configuration.- SSL Certificate Paths:
Ensure that the SSL certificate paths match your domain.- Security Enhancements:
Added headers and rate limiting for improved security.
🔧 Explanation of Added Configurations:
- Redirect HTTP to HTTPS:
The first server block listens on port 80 and redirects all traffic to HTTPS, ensuring encrypted connections.- Security Headers:
Added various headers likeX-Frame-Options,Strict-Transport-Security, andContent-Security-Policyto enhance security by preventing clickjacking, enforcing HTTPS, and controlling resource loading.- Rate Limiting (
limit_req):
Limits incoming requests to 10 per second with a burst of 20, protecting against DDoS attacks.- Client Body Size Limit (
client_max_body_size):
Increases the maximum allowed size of the client request body to 100MB, accommodating larger builds or uploads.- WebSocket Support:
Configures Nginx to handle WebSocket connections, which Jenkins uses for real-time updates.- Request Method Restrictions (
limit_except):
Only allowsGET,POST, andHEADmethods, denying all others for added security.
🔄 c. Enable the Jenkins Server Block
Activate the Jenkins configuration by creating a symbolic link:
sudo ln -s /etc/nginx/sites-available/jenkins /etc/nginx/sites-enabled/
🔗 Note:
If you encounter an error stating that the file already exists, you can remove the existing symlink and recreate it:
sudo rm /etc/nginx/sites-enabled/jenkins
sudo ln -s /etc/nginx/sites-available/jenkins /etc/nginx/sites-enabled/
🧪 d. Test Nginx Configuration
Before restarting Nginx, it’s crucial to test the configuration for any syntax errors.
sudo nginx -t
✅ Expected Output:
nginx: the configuration file /etc/nginx/nginx.conf syntax is ok
nginx: configuration file /etc/nginx/nginx.conf test is successful
❌ If Errors Appear:
Review the error messages, fix any issues in the configuration files, and retest.
🔄 e. Restart Nginx to Apply Changes
sudo systemctl restart nginx
📢 Pro Tip:
Usesudo systemctl reload nginxinstead ofrestartif you prefer to apply changes without dropping connections.
🔒 Step 9: Secure Jenkins with Certbot (Let’s Encrypt)
With Nginx configured as a reverse proxy, it’s time to secure your Jenkins server with HTTPS using Let’s Encrypt SSL certificates. Certbot will help automate the process of obtaining and renewing these certificates.
🛠️ a. Install Certbot
Certbot automates the process of obtaining and renewing SSL certificates from Let’s Encrypt.
sudo apt install -y certbot python3-certbot-nginx
🔑 b. Obtain and Install SSL Certificate
Use Certbot to obtain an SSL certificate for your domain. Replace jenkins.your_domain.com with your actual domain name.
sudo certbot --nginx -d jenkins.your_domain.com
📝 During the Process:
- Enter Email Address:
Provide an email for urgent renewal and security notices.- Agree to Terms of Service:
TypeYand press Enter.- Share Your Email (Optional):
Choose whether to share your email with the Electronic Frontier Foundation.- Redirect HTTP to HTTPS:
Select2to redirect all traffic to HTTPS (recommended).
🔄 What Certbot Does:
- Obtains an SSL certificate from Let’s Encrypt.
- Configures Nginx to use the obtained SSL certificates.
- Sets up automatic renewal for the certificates.
🛠️ c. Verify SSL Installation
After Certbot finishes, navigate to https://jenkins.your_domain.com in your browser. You should see a secure padlock icon indicating a successful SSL setup.
🔄 d. Adjust Firewall for HTTPS (If Necessary)
Ensure that HTTPS traffic is allowed through the firewall.
sudo ufw allow 'Nginx Full'
sudo ufw reload
📌 Note:
The'Nginx Full'profile allows both HTTP (port 80) and HTTPS (port 443) traffic. Since we’ve set up redirection from HTTP to HTTPS, you can optionally remove the HTTP rule to enforce HTTPS-only access.
✅ Step 10: Final Verification
You’re almost at the finish line! Let’s ensure everything is working as expected.
🖥️ a. Access Jenkins Securely
- URL:
https://jenkins.your_domain.com - Check for Secure Connection:
Look for the padlock icon in your browser’s address bar, indicating a secure HTTPS connection.
🏃♂️ b. Run Another Sample Job
- Create a New Job:
- Click “New Item”
- Name it
Secure-Test-Job - Select “Freestyle project” and click “OK”
- Configure the Job:
- Under “Build”, click “Add build step” > “Execute shell”
- Enter the command:
echo "Secure Jenkins is up and running! 🔒🚀"
- Save and Build:
- Click “Save”
- Click “Build Now”
- Check Build Output:
- Click on the build number (e.g.,
#1)Click “Console Output”
Building in workspace /var/lib/jenkins/workspace/Secure-Test-Job [Secure-Test-Job] $ /bin/bash -c echo "Secure Jenkins is up and running! 🔒🚀" Secure Jenkins is up and running! 🔒🚀 - Click on the build number (e.g.,
🛠️ c. Monitor Jenkins Service
Ensure Jenkins is running without issues.
sudo systemctl status jenkins
💬 Expected Output:
jenkins.service - Jenkins Continuous Integration Server
     Loaded: loaded (/lib/systemd/system/jenkins.service; enabled; vendor preset: enabled)
     Active: active (running) since ...
🔄 d. Test SSL Certificate Renewal
Let’s Encrypt certificates are valid for 90 days. Certbot sets up automatic renewal, but it’s good to test it.
sudo certbot renew --dry-run
✅ Expected Output:
Congratulations, all renewals succeeded. The following certs have been renewed:
  /etc/letsencrypt/live/jenkins.your_domain.com/fullchain.pem (success)
🎉 Conclusion
🎊 Congratulations! 🎊 You’ve successfully set up a Jenkins server on Ubuntu 24.04 using OpenJDK 21, configured Nginx as a secure reverse proxy, and protected your setup with HTTPS using Let’s Encrypt. This robust configuration ensures that your CI/CD pipelines are both efficient and secure. 🛡️🚀
🌟 What’s Next?
- Explore Jenkins Plugins:
- Enhance Jenkins with plugins that cater to your development and deployment needs.
- Automate Your CI/CD Pipelines:
- Start creating pipelines to automate builds, tests, and deployments.
- Implement Advanced Security:
- Consider setting up role-based access controls (RBAC) within Jenkins.
- Enable two-factor authentication (2FA) for added security.
- Monitor and Optimize:
- Integrate monitoring tools to keep an eye on Jenkins’ performance.
- Regularly update Jenkins and its plugins to the latest versions.
- Backup Configurations:
- Set up regular backups for Jenkins configurations and job data to prevent data loss.
📣 Share Your Success!
Feel free to share your Jenkins setup journey with the community. Your experiences can help others navigate similar setups and overcome challenges. 🌐💬
🔗 Useful Links:
Jenkins Official Documentation
Best Practices for Jenkins Security
⚠️ Disclaimer:
While this guide provides a comprehensive setup, always tailor configurations to fit your specific environment and security requirements. Regularly review and update your setup to maintain optimal security and performance.*
🙌 Happy Coding! 🖥️✨


